Wednesday, January 14, 2009
MOSS Configuration: How to view the real exception behind the displayed custom error page?
A. Overview
For a SharePoint developer, the error message An unexpected error occurred is useless! A developer needs to get details about the error that has occurred, at least the exception's call stack.
When installing MOSS, the default configuration is that the Call Stack is deactivated and the custom error pages are turned on. This is completely correct, because this is how you would wish to have it on your production system.
Now comes the question:
How should I -as a developer- change the default configuration on my development environment?
B. Configure your development environment
1. Open the web.config file
Path: C:\Inetpub\wwwroot\wss\VirtualDirectories\80\web.config
2. Turn on the call stack
- Search for safemode element.
- Change CallStack="false" to CallStack="true".
3. Turn off the custom error pages
- Search for customerrors element.
- Change mode="On" to mode="Off".
4. Enable debugging and batch compilation
- Search for compilation element.
- Change batch="false" debug="false" to batch="true" debug="true".
C. Test your configuration
- Browse the page that has previously thrown the "An unexpected error occurred" message.
- You should now see the yellow ASP.NET page with the true exception and underlying call stack.


Friday, January 2, 2009
SPD Workflow: How to create a formatted body for the Send Email task?
A. Overview
The Send Email is a very popular action for SPD workflow developers. Unfortunately, the Editor of the e-mail body doesn't contain any formatting tools. That's a lot of luxury to ask for. But as the need arises, I have written this article to provide the steps for creating formatted e-mail bodies in the Send Email action.
I have taken the idea and some of the content of this article from an Office Online video tutorial with the title Watch this: Design a document review workflow solution.
B. Design the HTML needed in the body
1. Open Microsoft Office SharePoint Designer 2007.
2. Click File > New > HTML, in order to create a new HTML page.
3. A new panel opens. In the bottom left corner of this panel, make sure that the Split View is selected, as shown in the following figure.

IMPORTANT NOTE:
There are two considerations when you use HTML in workflows:
Consideration 1:
Workflow e-mails do not support class-based styles. All the formatting must be done using inline styles.
The following configuration steps should be performed:
- Click the Style Application icon on the bottom bar.
- Make sure that Style Application is set to Manual and the Target Rule is set to New Inline Style.

Consideration 2:
Any white space will affect how the designed HTML will be displayed. Therefore, it is recommended to remove it.
This can be done easily by performing these steps:
- Click Tools > Optimize HTML.
- In the Remove Whitespace section, select HTML all whitespace.

- Click OK. You can see that all the whitespace has been removed from the HTML code in the Code Pane.
To get the formatted text again, you should follow these steps:
- Select the text in the Code Pane and right-click it.
- Click Reformat HTML.
Now let's continue designing our HTML for the e-mail body.
5. Delete the default text in the Code Pane.
6. Copy and Paste the following text as an example in the Code Pane.
7. Click anywhere in the Design Pane, in order to see how your mail body would look like.
8. Perform the changes you wish.
9. Now remove the whitespace as explained in the previous Note section.
10. Copy your HTML code to a text file and save it, in order to be used later in the workflow.
C. Create the workflow
1. Click File > Open Site.
2. Enter the URL of the site containing an announcement list, on which we shall perform our test.
3. Now click File > New > Workflow.
4. On the Define your new workflow page, enter the following data:
6. Enter Send formatted Mail Body as the Step Name.
7. In the Actions section, select the action Send an Email.
8. Click the this message link.
9. Fill the To and Subject fields with appropriate values.
10. Paste the HTML code which was designed in section B into the Body area.
11. Repalce the fields marked by [*****LOOKUP******] with the correct values using the Lookup wizard.

12. Click OK to close the message builder.
13. Click Finish to save and publish the workflow.
D. Test the solution
1. Browse the site containing the annoucenemnts list to which the workflow was attached.
2. Open the Annoucements list.
3. Create a new entry.
4. Check the body of the sent e-mail notification.

The Send Email is a very popular action for SPD workflow developers. Unfortunately, the Editor of the e-mail body doesn't contain any formatting tools. That's a lot of luxury to ask for. But as the need arises, I have written this article to provide the steps for creating formatted e-mail bodies in the Send Email action.
I have taken the idea and some of the content of this article from an Office Online video tutorial with the title Watch this: Design a document review workflow solution.
B. Design the HTML needed in the body
1. Open Microsoft Office SharePoint Designer 2007.
2. Click File > New > HTML, in order to create a new HTML page.
3. A new panel opens. In the bottom left corner of this panel, make sure that the Split View is selected, as shown in the following figure.

IMPORTANT NOTE:
There are two considerations when you use HTML in workflows:
Consideration 1:
Workflow e-mails do not support class-based styles. All the formatting must be done using inline styles.
The following configuration steps should be performed:
- Click the Style Application icon on the bottom bar.
- Make sure that Style Application is set to Manual and the Target Rule is set to New Inline Style.

Consideration 2:
Any white space will affect how the designed HTML will be displayed. Therefore, it is recommended to remove it.
This can be done easily by performing these steps:
- Click Tools > Optimize HTML.
- In the Remove Whitespace section, select HTML all whitespace.

- Click OK. You can see that all the whitespace has been removed from the HTML code in the Code Pane.
To get the formatted text again, you should follow these steps:
- Select the text in the Code Pane and right-click it.
- Click Reformat HTML.
Now let's continue designing our HTML for the e-mail body.
5. Delete the default text in the Code Pane.
6. Copy and Paste the following text as an example in the Code Pane.
7. Click anywhere in the Design Pane, in order to see how your mail body would look like.
8. Perform the changes you wish.
9. Now remove the whitespace as explained in the previous Note section.
10. Copy your HTML code to a text file and save it, in order to be used later in the workflow.
C. Create the workflow
1. Click File > Open Site.
2. Enter the URL of the site containing an announcement list, on which we shall perform our test.
3. Now click File > New > Workflow.
4. On the Define your new workflow page, enter the following data:
- Name: FormattingMails
- Attachment List: Announcements
- Start Options: Automatically start this workflow when a new item is created
6. Enter Send formatted Mail Body as the Step Name.
7. In the Actions section, select the action Send an Email.
8. Click the this message link.
9. Fill the To and Subject fields with appropriate values.
10. Paste the HTML code which was designed in section B into the Body area.
11. Repalce the fields marked by [*****LOOKUP******] with the correct values using the Lookup wizard.

12. Click OK to close the message builder.
13. Click Finish to save and publish the workflow.
D. Test the solution
1. Browse the site containing the annoucenemnts list to which the workflow was attached.
2. Open the Annoucements list.
3. Create a new entry.
4. Check the body of the sent e-mail notification.

MOSS Configuration: How to display announcements on the home page of a Publishing Portal?
A. Overview
Recently, I have encountered the question of how to add an announcements web part on the home page of a Publishing Portal. The same question arises for Calendar, Contacts, Discussion Board, Survey and a set of other lists, which belong to the so-called Team Collaboration Lists.
As the title conveys, in this article I shall provide the steps for adding an announcements web part on the Home Page of a Publishing Portal. The exact same steps should be applied for displaying any other Team Collaboration List.
In the last section of the article, I provide a note about how to accomplish the same task on a Collaboration Portal
B. Create an Announcements list
B.1. Steps for creating an Annoucements List:
1. Browse the Home Page of the Publishing Portal.
2. Go to Site Actions > Site Settings > Modify All Site Settings.
4. Under Site Administration, click Site Libraries and lists.
5. Click Create new content.
PROBLEM: You would not find the Announcements list, as shown in the following figure.
 The reason for this problem is that the Team Collaboration Lists Feature is not activated by default on a Publishing Portal. The next section would show you how to activite this feature.
B.2. Steps for activating the Team Collaboration Lists Feature
1. Go to Site Actions > Site Settings > Modify All Site Settings.
2. Under Site Administration, click Site features.
3. Activate the Team Collaboration Lists.
The reason for this problem is that the Team Collaboration Lists Feature is not activated by default on a Publishing Portal. The next section would show you how to activite this feature.
B.2. Steps for activating the Team Collaboration Lists Feature
1. Go to Site Actions > Site Settings > Modify All Site Settings.
2. Under Site Administration, click Site features.
3. Activate the Team Collaboration Lists.
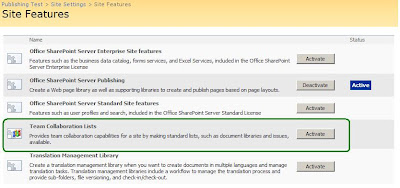 4. Now repeat the steps for creating an Annoucenemts list which are described in section B.1. and you would find the Announcements under the Communications section, as shown in the following figure.
 C. Add the Announcements on the Home Page
With section B finished successfully, the new announcements list has been added as content to the portal site. Now we would add a web part to view the content of the announcements on the Home Page.
This can be accomplished by performing these steps:
1. Browse the Home Page of the Publishing Portal.
2. Go to Site Actions > Edit Page.
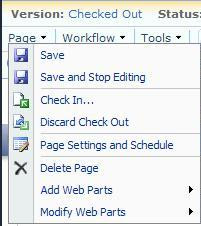
3. From the Page menu, select Add Web Parts and click Browse.
C. Add the Announcements on the Home Page
With section B finished successfully, the new announcements list has been added as content to the portal site. Now we would add a web part to view the content of the announcements on the Home Page.
This can be accomplished by performing these steps:
1. Browse the Home Page of the Publishing Portal.
2. Go to Site Actions > Edit Page.
3. From the Page menu, select Add Web Parts and click Browse.
 4. Click the Filter icon in the Add Web Parts pane.
5. Select Lists from the Show drop down list.
4. Click the Filter icon in the Add Web Parts pane.
5. Select Lists from the Show drop down list.
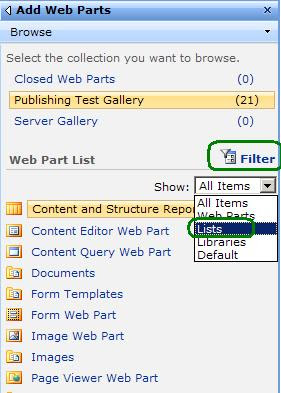 6. Select the announcements list created in section B.
7. Click the Add button.
D. What about Collaboration Portals
In a Collabortaion Portal, the Team Collaboration Lists Feature is activated by default. Thus, you can follow the same steps described in section B.1. for creating a new announcements list, without having to activate the feature first (as described in section B.2.). Finally, you would add the announcements web part on the Home Page by following the same steps described in section C.
6. Select the announcements list created in section B.
7. Click the Add button.
D. What about Collaboration Portals
In a Collabortaion Portal, the Team Collaboration Lists Feature is activated by default. Thus, you can follow the same steps described in section B.1. for creating a new announcements list, without having to activate the feature first (as described in section B.2.). Finally, you would add the announcements web part on the Home Page by following the same steps described in section C.
 The reason for this problem is that the Team Collaboration Lists Feature is not activated by default on a Publishing Portal. The next section would show you how to activite this feature.
B.2. Steps for activating the Team Collaboration Lists Feature
1. Go to Site Actions > Site Settings > Modify All Site Settings.
2. Under Site Administration, click Site features.
3. Activate the Team Collaboration Lists.
The reason for this problem is that the Team Collaboration Lists Feature is not activated by default on a Publishing Portal. The next section would show you how to activite this feature.
B.2. Steps for activating the Team Collaboration Lists Feature
1. Go to Site Actions > Site Settings > Modify All Site Settings.
2. Under Site Administration, click Site features.
3. Activate the Team Collaboration Lists.
 4. Now repeat the steps for creating an Annoucenemts list which are described in section B.1. and you would find the Announcements under the Communications section, as shown in the following figure.
 C. Add the Announcements on the Home Page
With section B finished successfully, the new announcements list has been added as content to the portal site. Now we would add a web part to view the content of the announcements on the Home Page.
This can be accomplished by performing these steps:
1. Browse the Home Page of the Publishing Portal.
2. Go to Site Actions > Edit Page.
3. From the Page menu, select Add Web Parts and click Browse.
C. Add the Announcements on the Home Page
With section B finished successfully, the new announcements list has been added as content to the portal site. Now we would add a web part to view the content of the announcements on the Home Page.
This can be accomplished by performing these steps:
1. Browse the Home Page of the Publishing Portal.
2. Go to Site Actions > Edit Page.
3. From the Page menu, select Add Web Parts and click Browse.
 4. Click the Filter icon in the Add Web Parts pane.
5. Select Lists from the Show drop down list.
4. Click the Filter icon in the Add Web Parts pane.
5. Select Lists from the Show drop down list.
 6. Select the announcements list created in section B.
7. Click the Add button.
D. What about Collaboration Portals
In a Collabortaion Portal, the Team Collaboration Lists Feature is activated by default. Thus, you can follow the same steps described in section B.1. for creating a new announcements list, without having to activate the feature first (as described in section B.2.). Finally, you would add the announcements web part on the Home Page by following the same steps described in section C.
6. Select the announcements list created in section B.
7. Click the Add button.
D. What about Collaboration Portals
In a Collabortaion Portal, the Team Collaboration Lists Feature is activated by default. Thus, you can follow the same steps described in section B.1. for creating a new announcements list, without having to activate the feature first (as described in section B.2.). Finally, you would add the announcements web part on the Home Page by following the same steps described in section C.
SPD Workflow: A workflow does not start automatically
A. Overview
Last week, a colleague of mine has encountered a problem with workflows authored in SharePoint Designer. When a workflow is configured to start automatically when a new item is created or changed, the workflow does not start as expected and the log file does not contain any error messages. However, if you start the workflow manually, everything works just fine.
Afer some analysis and search, the problem was resolved. The following sections contain details about the source of the problem and all the symptoms, the cause of that problem and finally the fix. This information is taken from an article on Microsoft's Help and Support site.
B. Symptoms
After you install Windows SharePoint Services 3.0 Service Pack 1 (SP1), a declarative workflow does not start automatically in the following products:
- Windows SharePoint Services 3.0
- Microsoft Office SharePoint Server 2007
- Microsoft Office SharePoint Designer 2007
- The Windows SharePoint Services Web application runs under a user's domain account.
- The user logs in by using this domain account.
- The site displays the user name as System Account.
- On the server that is running one of the products that is listed in the "Applies to" section, click Start, point to All Programs, point to Microsoft Office Server, and then click SharePoint 3.0 Central Administration.
- Click the Operations tab.
- Under Security Configuration, click Service Accounts.
- Click Web application pool, and then click Windows SharePoint Services Web Application in the Web service box.
- In the Application pool box, click the application pool that you want to change.
- Under Select an account for this component, click Configurable, and then type the user name and the password for the different user account.
- Microsoft Windows SharePoint Services 3.0
- Microsoft Office SharePoint Designer 2007
- Microsoft Office SharePoint Server 2007
Saturday, December 20, 2008
SPD Workflow: The changes performed in the workflow are not reflected on the site
A. Introduction:
I have recently encountered a very weird problem while working with SPD workflows:
- Open the workflow's XOML file.
- Perform some changes to the workflow steps.
- Click the Finish button, in order to save the changes.
- Although the changes are saved successfully, the next time the workflow is triggered the old version of the workflow is run. In other words, the changes done to the workflow are not refelected on the site.
- Restart SharePoint Designer.
- Open the workflow, perform any simple change (e.g. Log To History List) and click Finish.
- Trigger the workflow -> Changes are not refelected.
- Close SharePoint Designer.
- Open the workflow settings of the list to which the worklfow is attached.
- Remove all the workflow instances attached to the list.
- Open SharePoint Designer.
- Open the workflow, perform any simple change (e.g. Log To History List) and click Finish.
- Trigger the workflow -> Changes are not refelected.
- Close SharePoint Designer.
- Open the workflow settings of the list to which the worklfow is attached.
- Remove all the previous versions of the workflow instances attached to the list. (Cleanup step)
- Save the list as a template. NOTE: Select the Include Content checkbox.
- Delete the list to which the workflow is attached.
- Create a new list using the saved list template.
- Open SharePoint Designer.
- Open the workflow, perform any simple change (e.g. Log To History List) and click Finish.
- Trigger the workflow -> The changes are refelected correctly.
- Close SharePoint Designer.
- Open the workflow settings of the list to which the worklfow is attached.
- Remove all the the workflow instances attached to the list, including the current version.
- Open SharePoint Designer.
- Create a new workflow on the same list and add any simple condition and any simple action to it.
- Click Finish, in order to save and publish the new workflow. Note that the new workflow has the files [workflow name].xoml and [workflow name].xoml.rules.
- Using Notepad, copy the content of the old "xoml" file into the new "xoml" file.
- Using Notepad, copy the content of the old "xoml.rules" file into the new "xoml.rules" file.
- Open the new worklfow and quickly go through all the conditions and actions, to make sure that no variables are corrupt. Note: In case you use a Collect Data From User action in your workflow, I recommend that you create a new action and remove the old one.
- Click Finish, in order to save and publish the new workflow.
- In case the new workflow is saved properly, delete the old workflow in SPD. This can be done by right-clicking the workflow's name under the Worklfows node, selecting Delete and confriming the deletion when the warning message appears.
- Finally, trigger the workflow -> The changes are refelected correctly.
Wednesday, December 17, 2008
SPD Workflow: How to deploy an SPD workflow to another site?
A. Introduction
SharePoint Designer provides a very simple workflow editing tool. Workflows authored in SPD can be developed very quickly. However, this ease of use come with a cost: SPD workflows cannot be reused from one list to another or one site to another.
Well, the truth is, you can re-use your workflows on multiple lists by making a few careful modifications to your workflow files that exist within SPD. Nevertheless, this method is not recommended nor supported by Microsoft.
B. Migration Steps
For accomplishing this task, you have to manually perform changes in the XOML file(s). The following articles provide step-by-step guides:
Re-using SharePoint Designer workflows in multiple lists:
http://www.sharepointblogs.com/tbone/archive/2007/11/20/re-using-sharepoint-designer-workflows-in-multiple-lists.aspx
Re-parenting a SharePoint Designer workflow to a different list:
http://www.sharepointblogs.com/andynoon/archive/2007/09/18/reparenting-a-workflow-to-a-different-list.aspx
Applying a SharePoint Designer Workflow to multiple Lists:
http://nickgrattan.wordpress.com/2007/10/17/applying-a-sharepoint-designer-workflow-to-multiple-lists/
Porting SharePoint Designer Workflows to Visual Studio:
http://blogs.msdn.com/sharepointdesigner/archive/2007/07/06/porting-sharepoint-designer-workflows-to-visual-studio.aspx
Sunday, December 14, 2008
SPD Workflow: What happens when I edit an item while the workflow is In Progress?
A. Introduction
If one designs a workflow that should start either when an new item is created or whenever an item is changed, then a typical question that popps into one's mind is:
What happens if a workflow is In Progress and the item on which the workflow is running gets changed?
Possible answers are:
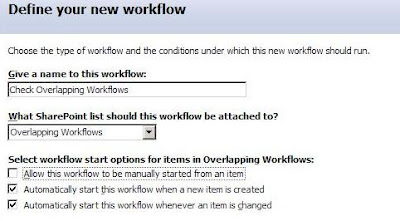 - Click Next, in order to start designing the workflow steps.
- Enter Add tracking logs as the Step Name.
- In the Actions section, select the action Build Dynamic String.
- Click dynamic string link and type the text Title before Pause is:. Now click the Add Lookup button. For the Source select Current Item and for the field select Title. Click to close the lookup window. Then click OKOK again, in order to close the String Builder window.
- Click the Variable link and select Create a new variable. Type TitleBefore as the Name and select String as type and click OK.
- Add the action Log to History List.
- Click the this message link and click fx. For the Source select Workflow Data and for the field select Variable:TitleBefore.
- Add the action Pause For Duration.
- Change the duration to 5 minutes.
- Add the action Build Dynamic String.
- Click dynamic string link and type the text Title after Pause is:. Now click the Add Lookup button. For the Source select Current Item and for the field select Title. Click to close the lookup window. Then click OKOK again, in order to close the String Builder window.
- Click the Variable link and select Create a new variable. Type TitleAfter as the Name and select String as type and click OK.
- Add the action Log to History List.
- Click the this message link and click fx. For the Source select Workflow Data and for the field select Variable:TitleAfter.
- Click Next, in order to start designing the workflow steps.
- Enter Add tracking logs as the Step Name.
- In the Actions section, select the action Build Dynamic String.
- Click dynamic string link and type the text Title before Pause is:. Now click the Add Lookup button. For the Source select Current Item and for the field select Title. Click to close the lookup window. Then click OKOK again, in order to close the String Builder window.
- Click the Variable link and select Create a new variable. Type TitleBefore as the Name and select String as type and click OK.
- Add the action Log to History List.
- Click the this message link and click fx. For the Source select Workflow Data and for the field select Variable:TitleBefore.
- Add the action Pause For Duration.
- Change the duration to 5 minutes.
- Add the action Build Dynamic String.
- Click dynamic string link and type the text Title after Pause is:. Now click the Add Lookup button. For the Source select Current Item and for the field select Title. Click to close the lookup window. Then click OKOK again, in order to close the String Builder window.
- Click the Variable link and select Create a new variable. Type TitleAfter as the Name and select String as type and click OK.
- Add the action Log to History List.
- Click the this message link and click fx. For the Source select Workflow Data and for the field select Variable:TitleAfter.
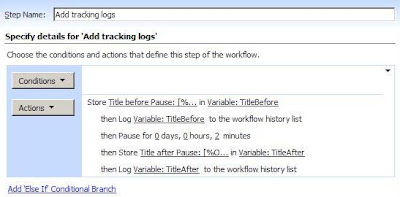 - Click Finish, in order to save and publish the workflow.
C.1.2 Test the workflow
Steps:
1. Create a new item with title Title 1.
2. Edit the item, before the workflow instance completes by changing the title to Title 2.
3. After the workflow completes, edit the item again by changing the title to Title 3.
4. Now edit the item, before the new workflow instance completes by changing the title to Title 4.
Observations:
1. Only one workflow instance is running on an item at a certain point in time. The Edit operation in step 2 does not start a new workflow instance.
2. After this workflow completes, the history looks as follows:
- Click Finish, in order to save and publish the workflow.
C.1.2 Test the workflow
Steps:
1. Create a new item with title Title 1.
2. Edit the item, before the workflow instance completes by changing the title to Title 2.
3. After the workflow completes, edit the item again by changing the title to Title 3.
4. Now edit the item, before the new workflow instance completes by changing the title to Title 4.
Observations:
1. Only one workflow instance is running on an item at a certain point in time. The Edit operation in step 2 does not start a new workflow instance.
2. After this workflow completes, the history looks as follows:
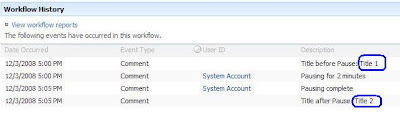 3. The Edit operation in step 3 triggers a new workflow instance.
4. After this workflow completes, the history looks as follows:
3. The Edit operation in step 3 triggers a new workflow instance.
4. After this workflow completes, the history looks as follows:
 C.1.3 Conclusions
1. If an instance of the workflow is running, no other instance gets created.
2. The workflow's action deal with the current values of the item. The actions cannot differentiate whether these values are the original ones that have trigged the workflow or not.
C.2. Experiment 2: Create separate workflows for Create and Edit events
C.2.1 Prepare the workflows
I would not write this section into so much detail like C.1.1, because we will use the same actions as before but with different configurations. Hence, I will keep my description simple.
- Create a first workflow with the following definition:
* Name: On Create Workflow
* Attachment List: Overlapping Workflows
* Start Options: Automatically start this workflow when a new item is created
- The only step of this workflow is exactly like the one described in section C.1.1.
- Create a second workflow with the following definition:
* Name: On Change Workflow
* Attachment List: Overlapping Workflows
* Start Options: Automatically start this workflow whenever an item is changed
- The only step of this workflow is exactly like the one described in section C.1.1.
C.2.2 Test the workflow
Steps:
1. Create a new item with title Title 1.
2. Edit the item, before the workflow instance completes by changing the title to Title 2.
Observations:
1. The Create operation in step 1 triggers the On Create Workflow.
2. The Edit operation in step 2 triggers the On Change Workflow, while the On Create Workflow is running.
3. After the On Create Workflow completes, the history looks as follows:
4. After the On Change Workflow completes, the history looks as follows:
C.1.3 Conclusions
1. If an instance of the workflow is running, no other instance gets created.
2. The workflow's action deal with the current values of the item. The actions cannot differentiate whether these values are the original ones that have trigged the workflow or not.
C.2. Experiment 2: Create separate workflows for Create and Edit events
C.2.1 Prepare the workflows
I would not write this section into so much detail like C.1.1, because we will use the same actions as before but with different configurations. Hence, I will keep my description simple.
- Create a first workflow with the following definition:
* Name: On Create Workflow
* Attachment List: Overlapping Workflows
* Start Options: Automatically start this workflow when a new item is created
- The only step of this workflow is exactly like the one described in section C.1.1.
- Create a second workflow with the following definition:
* Name: On Change Workflow
* Attachment List: Overlapping Workflows
* Start Options: Automatically start this workflow whenever an item is changed
- The only step of this workflow is exactly like the one described in section C.1.1.
C.2.2 Test the workflow
Steps:
1. Create a new item with title Title 1.
2. Edit the item, before the workflow instance completes by changing the title to Title 2.
Observations:
1. The Create operation in step 1 triggers the On Create Workflow.
2. The Edit operation in step 2 triggers the On Change Workflow, while the On Create Workflow is running.
3. After the On Create Workflow completes, the history looks as follows:
4. After the On Change Workflow completes, the history looks as follows:
 C.2.3 Conclusions
1. It is possible to run more than one workflow instance on an item, if these instances are not of the same workflow.
2. The workflow's action deal with the current values of the item. The actions cannot differentiate whether these values are the original ones that have trigged the workflow or not.
D. Applications
Well, in the previous section, I have just illustrated the results I have found out from my experiments. In other words, this is how it works out-of-the-box. Now comes the question of how to apply this to our workflow solutions.
In this section, I would like to provide tips and suggestions of the FAQ in related topics.
Question 1:
When I create a workflow that starts when a new item is created OR whenever an item is changed. The actions performed in both situations are the same except for one step which should differ based on whether the processed item is a new one or just an updated one.
How can one find out whether the workflow was triggered due to an item's change or a new item's creation?
Answer 1:
Check this article:
http://samar-hossam-sharepoint-spot.blogspot.com/2008/11/moss-workflow-was-workflow-started-due.html
Question 2:
I have a workflow that starts when a new item is created OR whenever an item is changed. Whenever a workflow is running on an item, I would like to lock this item for further edits until the workflow finishes.
Answer 2:
You should write a custom activity which locks/unlocks an item. You should use this activity at the beginning of the workflow, in order to lock the item and use it again at the end of the workflow, in order to unlock it.
Check the following custom SPD activity on CodePlex:
Grant Permission on Item
C.2.3 Conclusions
1. It is possible to run more than one workflow instance on an item, if these instances are not of the same workflow.
2. The workflow's action deal with the current values of the item. The actions cannot differentiate whether these values are the original ones that have trigged the workflow or not.
D. Applications
Well, in the previous section, I have just illustrated the results I have found out from my experiments. In other words, this is how it works out-of-the-box. Now comes the question of how to apply this to our workflow solutions.
In this section, I would like to provide tips and suggestions of the FAQ in related topics.
Question 1:
When I create a workflow that starts when a new item is created OR whenever an item is changed. The actions performed in both situations are the same except for one step which should differ based on whether the processed item is a new one or just an updated one.
How can one find out whether the workflow was triggered due to an item's change or a new item's creation?
Answer 1:
Check this article:
http://samar-hossam-sharepoint-spot.blogspot.com/2008/11/moss-workflow-was-workflow-started-due.html
Question 2:
I have a workflow that starts when a new item is created OR whenever an item is changed. Whenever a workflow is running on an item, I would like to lock this item for further edits until the workflow finishes.
Answer 2:
You should write a custom activity which locks/unlocks an item. You should use this activity at the beginning of the workflow, in order to lock the item and use it again at the end of the workflow, in order to unlock it.
Check the following custom SPD activity on CodePlex:
Grant Permission on Item
- The Edit operation gets aborted till the workflow finishes.
- The Edit operation triggers a new workflow instance that starts running immediately.
- The Edit operation triggers a new workflow instance that waits in a queue till the first instance of the worklfow finishes.
- The Edit operation does not trigger a new workflow instance.
- Name: Check Overlapping Workflows
- Attachment List: Overlapping Workflows
- Start Options: Automatically start this workflow when a new item is created and Automatically start this workflow whenever an item is changed
 - Click Next, in order to start designing the workflow steps.
- Enter Add tracking logs as the Step Name.
- In the Actions section, select the action Build Dynamic String.
- Click dynamic string link and type the text Title before Pause is:. Now click the Add Lookup button. For the Source select Current Item and for the field select Title. Click to close the lookup window. Then click OKOK again, in order to close the String Builder window.
- Click the Variable link and select Create a new variable. Type TitleBefore as the Name and select String as type and click OK.
- Add the action Log to History List.
- Click the this message link and click fx. For the Source select Workflow Data and for the field select Variable:TitleBefore.
- Add the action Pause For Duration.
- Change the duration to 5 minutes.
- Add the action Build Dynamic String.
- Click dynamic string link and type the text Title after Pause is:. Now click the Add Lookup button. For the Source select Current Item and for the field select Title. Click to close the lookup window. Then click OKOK again, in order to close the String Builder window.
- Click the Variable link and select Create a new variable. Type TitleAfter as the Name and select String as type and click OK.
- Add the action Log to History List.
- Click the this message link and click fx. For the Source select Workflow Data and for the field select Variable:TitleAfter.
- Click Next, in order to start designing the workflow steps.
- Enter Add tracking logs as the Step Name.
- In the Actions section, select the action Build Dynamic String.
- Click dynamic string link and type the text Title before Pause is:. Now click the Add Lookup button. For the Source select Current Item and for the field select Title. Click to close the lookup window. Then click OKOK again, in order to close the String Builder window.
- Click the Variable link and select Create a new variable. Type TitleBefore as the Name and select String as type and click OK.
- Add the action Log to History List.
- Click the this message link and click fx. For the Source select Workflow Data and for the field select Variable:TitleBefore.
- Add the action Pause For Duration.
- Change the duration to 5 minutes.
- Add the action Build Dynamic String.
- Click dynamic string link and type the text Title after Pause is:. Now click the Add Lookup button. For the Source select Current Item and for the field select Title. Click to close the lookup window. Then click OKOK again, in order to close the String Builder window.
- Click the Variable link and select Create a new variable. Type TitleAfter as the Name and select String as type and click OK.
- Add the action Log to History List.
- Click the this message link and click fx. For the Source select Workflow Data and for the field select Variable:TitleAfter.
 - Click Finish, in order to save and publish the workflow.
C.1.2 Test the workflow
Steps:
1. Create a new item with title Title 1.
2. Edit the item, before the workflow instance completes by changing the title to Title 2.
3. After the workflow completes, edit the item again by changing the title to Title 3.
4. Now edit the item, before the new workflow instance completes by changing the title to Title 4.
Observations:
1. Only one workflow instance is running on an item at a certain point in time. The Edit operation in step 2 does not start a new workflow instance.
2. After this workflow completes, the history looks as follows:
- Click Finish, in order to save and publish the workflow.
C.1.2 Test the workflow
Steps:
1. Create a new item with title Title 1.
2. Edit the item, before the workflow instance completes by changing the title to Title 2.
3. After the workflow completes, edit the item again by changing the title to Title 3.
4. Now edit the item, before the new workflow instance completes by changing the title to Title 4.
Observations:
1. Only one workflow instance is running on an item at a certain point in time. The Edit operation in step 2 does not start a new workflow instance.
2. After this workflow completes, the history looks as follows:
 3. The Edit operation in step 3 triggers a new workflow instance.
4. After this workflow completes, the history looks as follows:
3. The Edit operation in step 3 triggers a new workflow instance.
4. After this workflow completes, the history looks as follows:
 C.1.3 Conclusions
1. If an instance of the workflow is running, no other instance gets created.
2. The workflow's action deal with the current values of the item. The actions cannot differentiate whether these values are the original ones that have trigged the workflow or not.
C.2. Experiment 2: Create separate workflows for Create and Edit events
C.2.1 Prepare the workflows
I would not write this section into so much detail like C.1.1, because we will use the same actions as before but with different configurations. Hence, I will keep my description simple.
- Create a first workflow with the following definition:
* Name: On Create Workflow
* Attachment List: Overlapping Workflows
* Start Options: Automatically start this workflow when a new item is created
- The only step of this workflow is exactly like the one described in section C.1.1.
- Create a second workflow with the following definition:
* Name: On Change Workflow
* Attachment List: Overlapping Workflows
* Start Options: Automatically start this workflow whenever an item is changed
- The only step of this workflow is exactly like the one described in section C.1.1.
C.2.2 Test the workflow
Steps:
1. Create a new item with title Title 1.
2. Edit the item, before the workflow instance completes by changing the title to Title 2.
Observations:
1. The Create operation in step 1 triggers the On Create Workflow.
2. The Edit operation in step 2 triggers the On Change Workflow, while the On Create Workflow is running.
3. After the On Create Workflow completes, the history looks as follows:
4. After the On Change Workflow completes, the history looks as follows:
C.1.3 Conclusions
1. If an instance of the workflow is running, no other instance gets created.
2. The workflow's action deal with the current values of the item. The actions cannot differentiate whether these values are the original ones that have trigged the workflow or not.
C.2. Experiment 2: Create separate workflows for Create and Edit events
C.2.1 Prepare the workflows
I would not write this section into so much detail like C.1.1, because we will use the same actions as before but with different configurations. Hence, I will keep my description simple.
- Create a first workflow with the following definition:
* Name: On Create Workflow
* Attachment List: Overlapping Workflows
* Start Options: Automatically start this workflow when a new item is created
- The only step of this workflow is exactly like the one described in section C.1.1.
- Create a second workflow with the following definition:
* Name: On Change Workflow
* Attachment List: Overlapping Workflows
* Start Options: Automatically start this workflow whenever an item is changed
- The only step of this workflow is exactly like the one described in section C.1.1.
C.2.2 Test the workflow
Steps:
1. Create a new item with title Title 1.
2. Edit the item, before the workflow instance completes by changing the title to Title 2.
Observations:
1. The Create operation in step 1 triggers the On Create Workflow.
2. The Edit operation in step 2 triggers the On Change Workflow, while the On Create Workflow is running.
3. After the On Create Workflow completes, the history looks as follows:
4. After the On Change Workflow completes, the history looks as follows:
 C.2.3 Conclusions
1. It is possible to run more than one workflow instance on an item, if these instances are not of the same workflow.
2. The workflow's action deal with the current values of the item. The actions cannot differentiate whether these values are the original ones that have trigged the workflow or not.
D. Applications
Well, in the previous section, I have just illustrated the results I have found out from my experiments. In other words, this is how it works out-of-the-box. Now comes the question of how to apply this to our workflow solutions.
In this section, I would like to provide tips and suggestions of the FAQ in related topics.
Question 1:
When I create a workflow that starts when a new item is created OR whenever an item is changed. The actions performed in both situations are the same except for one step which should differ based on whether the processed item is a new one or just an updated one.
How can one find out whether the workflow was triggered due to an item's change or a new item's creation?
Answer 1:
Check this article:
http://samar-hossam-sharepoint-spot.blogspot.com/2008/11/moss-workflow-was-workflow-started-due.html
Question 2:
I have a workflow that starts when a new item is created OR whenever an item is changed. Whenever a workflow is running on an item, I would like to lock this item for further edits until the workflow finishes.
Answer 2:
You should write a custom activity which locks/unlocks an item. You should use this activity at the beginning of the workflow, in order to lock the item and use it again at the end of the workflow, in order to unlock it.
Check the following custom SPD activity on CodePlex:
Grant Permission on Item
C.2.3 Conclusions
1. It is possible to run more than one workflow instance on an item, if these instances are not of the same workflow.
2. The workflow's action deal with the current values of the item. The actions cannot differentiate whether these values are the original ones that have trigged the workflow or not.
D. Applications
Well, in the previous section, I have just illustrated the results I have found out from my experiments. In other words, this is how it works out-of-the-box. Now comes the question of how to apply this to our workflow solutions.
In this section, I would like to provide tips and suggestions of the FAQ in related topics.
Question 1:
When I create a workflow that starts when a new item is created OR whenever an item is changed. The actions performed in both situations are the same except for one step which should differ based on whether the processed item is a new one or just an updated one.
How can one find out whether the workflow was triggered due to an item's change or a new item's creation?
Answer 1:
Check this article:
http://samar-hossam-sharepoint-spot.blogspot.com/2008/11/moss-workflow-was-workflow-started-due.html
Question 2:
I have a workflow that starts when a new item is created OR whenever an item is changed. Whenever a workflow is running on an item, I would like to lock this item for further edits until the workflow finishes.
Answer 2:
You should write a custom activity which locks/unlocks an item. You should use this activity at the beginning of the workflow, in order to lock the item and use it again at the end of the workflow, in order to unlock it.
Check the following custom SPD activity on CodePlex:
Grant Permission on Item
Subscribe to:
Posts (Atom)