A. Introduction
If one designs a workflow that should start either when an new item is created or whenever an item is changed, then a typical question that popps into one's mind is:
What happens if a workflow is In Progress and the item on which the workflow is running gets changed?
Possible answers are:
- The Edit operation gets aborted till the workflow finishes.
- The Edit operation triggers a new workflow instance that starts running immediately.
- The Edit operation triggers a new workflow instance that waits in a queue till the first instance of the worklfow finishes.
- The Edit operation does not trigger a new workflow instance.
Well, in this article I would like to illustrate the results of my experiments around this issue.
B. Preparations
Create a new list, which we would attach the workflow to. For this demo, I have created a custom list called
Overlapping Workflows.
C. Experiments
C.1. Experiment 1: Create one workflow for Create and Edit events
C.1.1 Prepare the workflow
- Open
Microsoft Office SharePoint Designer 2007.
- Click
File >
Open Site.
- Enter the
URL of the site containing our custom list called Overlapping Workflows.
- Now click
File >
New >
Workflow.
- On the
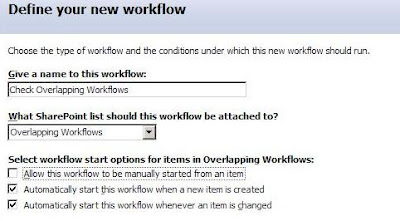
Define your new workflow page, enter the following data:
- Name: Check Overlapping Workflows
- Attachment List: Overlapping Workflows
- Start Options: Automatically start this workflow when a new item is created and Automatically start this workflow whenever an item is changed
- Click
Next, in order to start designing the workflow steps.
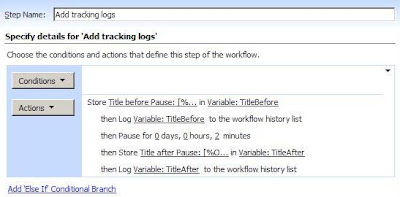
- Enter
Add tracking logs as the Step Name.
- In the
Actions section, select the action
Build Dynamic String.
- Click
dynamic string link and type the text
Title before Pause is:. Now click the Add Lookup button. For the
Source select
Current Item and for the
field select
Title. Click to close the lookup window. Then click
OKOK again, in order to close the String Builder window.
- Click the
Variable link and select
Create a new variable. Type
TitleBefore as the Name and select
String as type and click
OK.
- Add the action
Log to History List.
- Click the
this message link and click
fx. For the
Source select
Workflow Data and for the
field select
Variable:TitleBefore.
- Add the action
Pause For Duration.
- Change the duration to
5 minutes.
- Add the action
Build Dynamic String.
- Click
dynamic string link and type the text
Title after Pause is:. Now click the
Add Lookup button. For the
Source select
Current Item and for the
field select
Title. Click to close the lookup window. Then click
OKOK again, in order to close the String Builder window.
- Click the
Variable link and select
Create a new variable. Type
TitleAfter as the Name and select
String as type and click
OK.
- Add the action
Log to History List.
- Click the
this message link and click
fx. For the
Source select
Workflow Data and for the
field select
Variable:TitleAfter.
- Click
Finish, in order to save and publish the workflow.
C.1.2 Test the workflow
Steps:
1. Create a new item with title Title 1.
2. Edit the item, before the workflow instance completes by changing the title to Title 2.
3. After the workflow completes, edit the item again by changing the title to Title 3.
4. Now edit the item, before the new workflow instance completes by changing the title to Title 4.
Observations:
1. Only one workflow instance is running on an item at a certain point in time. The Edit operation in step 2 does not start a new workflow instance.
2. After this workflow completes, the history looks as follows:
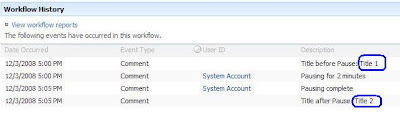
3. The Edit operation in step 3 triggers a new workflow instance.
4. After this workflow completes, the history looks as follows:
 C.1.3 Conclusions
1. If an instance of the workflow is running, no other instance gets created.
2. The workflow's action deal with the current values of the item. The actions cannot differentiate whether these values are the original ones that have trigged the workflow or not.
C.2. Experiment 2: Create separate workflows for Create and Edit events
C.2.1 Prepare the workflows
I would not write this section into so much detail like C.1.1, because we will use the same actions as before but with different configurations. Hence, I will keep my description simple.
- Create
a first workflow with the following definition:
*
Name: On Create Workflow
*
Attachment List: Overlapping Workflows
*
Start Options: Automatically start this workflow when a new item is created
- The only step of this workflow is
exactly like the one described in section C.1.1.
- Create
a second workflow with the following definition:
*
Name: On Change Workflow
*
Attachment List: Overlapping Workflows
*
Start Options: Automatically start this workflow whenever an item is changed
- The only step of this workflow is exactly like the one described in section C.1.1.
C.2.2 Test the workflow
Steps:
1. Create a new item with title Title 1.
2. Edit the item, before the workflow instance completes by changing the title to Title 2.
Observations:
1. The Create operation in step 1 triggers the On Create Workflow.
2. The Edit operation in step 2 triggers the On Change Workflow, while the On Create Workflow is running.
3. After the On Create Workflow completes, the history looks as follows:
4. After the On Change Workflow completes, the history looks as follows:
 C.2.3 Conclusions
1. It is possible to run more than one workflow instance on an item, if these instances are not of the same workflow.
2. The workflow's action deal with the current values of the item. The actions cannot differentiate whether these values are the original ones that have trigged the workflow or not.
D. Applications
Well, in the previous section, I have just illustrated the results I have found out from my experiments. In other words, this is how it works out-of-the-box. Now comes the question of how to apply this to our workflow solutions.
In this section, I would like to provide tips and suggestions of the FAQ in related topics.
Question 1:
When I create a workflow that starts when a new item is created OR whenever an item is changed. The actions performed in both situations are the same except for one step which should differ based on whether the processed item is a new one or just an updated one.
How can one find out whether the workflow was triggered due to an item's change or a new item's creation?
Answer 1:
Check this article:
http://samar-hossam-sharepoint-spot.blogspot.com/2008/11/moss-workflow-was-workflow-started-due.html
Question 2:
I have a workflow that starts when a new item is created OR whenever an item is changed. Whenever a workflow is running on an item, I would like to lock this item for further edits until the workflow finishes.
Answer 2:
You should write a custom activity which locks/unlocks an item. You should use this activity at the beginning of the workflow, in order to lock the item and use it again at the end of the workflow, in order to unlock it.
Check the following custom SPD activity on CodePlex:
Grant Permission on Item
 - Click Next, in order to start designing the workflow steps.
- Enter Add tracking logs as the Step Name.
- In the Actions section, select the action Build Dynamic String.
- Click dynamic string link and type the text Title before Pause is:. Now click the Add Lookup button. For the Source select Current Item and for the field select Title. Click to close the lookup window. Then click OKOK again, in order to close the String Builder window.
- Click the Variable link and select Create a new variable. Type TitleBefore as the Name and select String as type and click OK.
- Add the action Log to History List.
- Click the this message link and click fx. For the Source select Workflow Data and for the field select Variable:TitleBefore.
- Add the action Pause For Duration.
- Change the duration to 5 minutes.
- Add the action Build Dynamic String.
- Click dynamic string link and type the text Title after Pause is:. Now click the Add Lookup button. For the Source select Current Item and for the field select Title. Click to close the lookup window. Then click OKOK again, in order to close the String Builder window.
- Click the Variable link and select Create a new variable. Type TitleAfter as the Name and select String as type and click OK.
- Add the action Log to History List.
- Click the this message link and click fx. For the Source select Workflow Data and for the field select Variable:TitleAfter.
- Click Next, in order to start designing the workflow steps.
- Enter Add tracking logs as the Step Name.
- In the Actions section, select the action Build Dynamic String.
- Click dynamic string link and type the text Title before Pause is:. Now click the Add Lookup button. For the Source select Current Item and for the field select Title. Click to close the lookup window. Then click OKOK again, in order to close the String Builder window.
- Click the Variable link and select Create a new variable. Type TitleBefore as the Name and select String as type and click OK.
- Add the action Log to History List.
- Click the this message link and click fx. For the Source select Workflow Data and for the field select Variable:TitleBefore.
- Add the action Pause For Duration.
- Change the duration to 5 minutes.
- Add the action Build Dynamic String.
- Click dynamic string link and type the text Title after Pause is:. Now click the Add Lookup button. For the Source select Current Item and for the field select Title. Click to close the lookup window. Then click OKOK again, in order to close the String Builder window.
- Click the Variable link and select Create a new variable. Type TitleAfter as the Name and select String as type and click OK.
- Add the action Log to History List.
- Click the this message link and click fx. For the Source select Workflow Data and for the field select Variable:TitleAfter.
 - Click Finish, in order to save and publish the workflow.
C.1.2 Test the workflow
Steps:
1. Create a new item with title Title 1.
2. Edit the item, before the workflow instance completes by changing the title to Title 2.
3. After the workflow completes, edit the item again by changing the title to Title 3.
4. Now edit the item, before the new workflow instance completes by changing the title to Title 4.
Observations:
1. Only one workflow instance is running on an item at a certain point in time. The Edit operation in step 2 does not start a new workflow instance.
2. After this workflow completes, the history looks as follows:
- Click Finish, in order to save and publish the workflow.
C.1.2 Test the workflow
Steps:
1. Create a new item with title Title 1.
2. Edit the item, before the workflow instance completes by changing the title to Title 2.
3. After the workflow completes, edit the item again by changing the title to Title 3.
4. Now edit the item, before the new workflow instance completes by changing the title to Title 4.
Observations:
1. Only one workflow instance is running on an item at a certain point in time. The Edit operation in step 2 does not start a new workflow instance.
2. After this workflow completes, the history looks as follows:
 3. The Edit operation in step 3 triggers a new workflow instance.
4. After this workflow completes, the history looks as follows:
3. The Edit operation in step 3 triggers a new workflow instance.
4. After this workflow completes, the history looks as follows:
 C.1.3 Conclusions
1. If an instance of the workflow is running, no other instance gets created.
2. The workflow's action deal with the current values of the item. The actions cannot differentiate whether these values are the original ones that have trigged the workflow or not.
C.2. Experiment 2: Create separate workflows for Create and Edit events
C.2.1 Prepare the workflows
I would not write this section into so much detail like C.1.1, because we will use the same actions as before but with different configurations. Hence, I will keep my description simple.
- Create a first workflow with the following definition:
* Name: On Create Workflow
* Attachment List: Overlapping Workflows
* Start Options: Automatically start this workflow when a new item is created
- The only step of this workflow is exactly like the one described in section C.1.1.
- Create a second workflow with the following definition:
* Name: On Change Workflow
* Attachment List: Overlapping Workflows
* Start Options: Automatically start this workflow whenever an item is changed
- The only step of this workflow is exactly like the one described in section C.1.1.
C.2.2 Test the workflow
Steps:
1. Create a new item with title Title 1.
2. Edit the item, before the workflow instance completes by changing the title to Title 2.
Observations:
1. The Create operation in step 1 triggers the On Create Workflow.
2. The Edit operation in step 2 triggers the On Change Workflow, while the On Create Workflow is running.
3. After the On Create Workflow completes, the history looks as follows:
C.1.3 Conclusions
1. If an instance of the workflow is running, no other instance gets created.
2. The workflow's action deal with the current values of the item. The actions cannot differentiate whether these values are the original ones that have trigged the workflow or not.
C.2. Experiment 2: Create separate workflows for Create and Edit events
C.2.1 Prepare the workflows
I would not write this section into so much detail like C.1.1, because we will use the same actions as before but with different configurations. Hence, I will keep my description simple.
- Create a first workflow with the following definition:
* Name: On Create Workflow
* Attachment List: Overlapping Workflows
* Start Options: Automatically start this workflow when a new item is created
- The only step of this workflow is exactly like the one described in section C.1.1.
- Create a second workflow with the following definition:
* Name: On Change Workflow
* Attachment List: Overlapping Workflows
* Start Options: Automatically start this workflow whenever an item is changed
- The only step of this workflow is exactly like the one described in section C.1.1.
C.2.2 Test the workflow
Steps:
1. Create a new item with title Title 1.
2. Edit the item, before the workflow instance completes by changing the title to Title 2.
Observations:
1. The Create operation in step 1 triggers the On Create Workflow.
2. The Edit operation in step 2 triggers the On Change Workflow, while the On Create Workflow is running.
3. After the On Create Workflow completes, the history looks as follows:
 C.2.3 Conclusions
1. It is possible to run more than one workflow instance on an item, if these instances are not of the same workflow.
2. The workflow's action deal with the current values of the item. The actions cannot differentiate whether these values are the original ones that have trigged the workflow or not.
D. Applications
Well, in the previous section, I have just illustrated the results I have found out from my experiments. In other words, this is how it works out-of-the-box. Now comes the question of how to apply this to our workflow solutions.
In this section, I would like to provide tips and suggestions of the FAQ in related topics.
Question 1:
When I create a workflow that starts when a new item is created OR whenever an item is changed. The actions performed in both situations are the same except for one step which should differ based on whether the processed item is a new one or just an updated one.
How can one find out whether the workflow was triggered due to an item's change or a new item's creation?
Answer 1:
Check this article:
http://samar-hossam-sharepoint-spot.blogspot.com/2008/11/moss-workflow-was-workflow-started-due.html
Question 2:
I have a workflow that starts when a new item is created OR whenever an item is changed. Whenever a workflow is running on an item, I would like to lock this item for further edits until the workflow finishes.
Answer 2:
You should write a custom activity which locks/unlocks an item. You should use this activity at the beginning of the workflow, in order to lock the item and use it again at the end of the workflow, in order to unlock it.
Check the following custom SPD activity on CodePlex:
Grant Permission on Item
C.2.3 Conclusions
1. It is possible to run more than one workflow instance on an item, if these instances are not of the same workflow.
2. The workflow's action deal with the current values of the item. The actions cannot differentiate whether these values are the original ones that have trigged the workflow or not.
D. Applications
Well, in the previous section, I have just illustrated the results I have found out from my experiments. In other words, this is how it works out-of-the-box. Now comes the question of how to apply this to our workflow solutions.
In this section, I would like to provide tips and suggestions of the FAQ in related topics.
Question 1:
When I create a workflow that starts when a new item is created OR whenever an item is changed. The actions performed in both situations are the same except for one step which should differ based on whether the processed item is a new one or just an updated one.
How can one find out whether the workflow was triggered due to an item's change or a new item's creation?
Answer 1:
Check this article:
http://samar-hossam-sharepoint-spot.blogspot.com/2008/11/moss-workflow-was-workflow-started-due.html
Question 2:
I have a workflow that starts when a new item is created OR whenever an item is changed. Whenever a workflow is running on an item, I would like to lock this item for further edits until the workflow finishes.
Answer 2:
You should write a custom activity which locks/unlocks an item. You should use this activity at the beginning of the workflow, in order to lock the item and use it again at the end of the workflow, in order to unlock it.
Check the following custom SPD activity on CodePlex:
Grant Permission on Item
No comments:
Post a Comment